Razz Crossover Adjustments
The crossovers in the Razz speakers offer a very nice feature, the ability for you to adjust the output level of the midrange and tweeter independently from the woofer output, providing flexibility in the overall voicing of the speaker. This is helpful to compensate for room variations, synergy with the electronics, or for simply tuning the system to one’s taste. It’s a feature that my customers tell me they really appreciate having. Why don’t all speakers offer this?
The first Razz speakers produced have the resistor panel inside the cabinet, accessed by removing the midrange horn.
Newer Razz speakers have these resistors conveniently located in a recessed area on the back of each cabinet.
If you’ve got older Razz with the resistors inside, please contact me for written instructions on changing them.
Razz crossover adjustments discussed below are for current model only – with the resistors located in the recessed area on the back of each cabinet.
How To Make The Adjustments

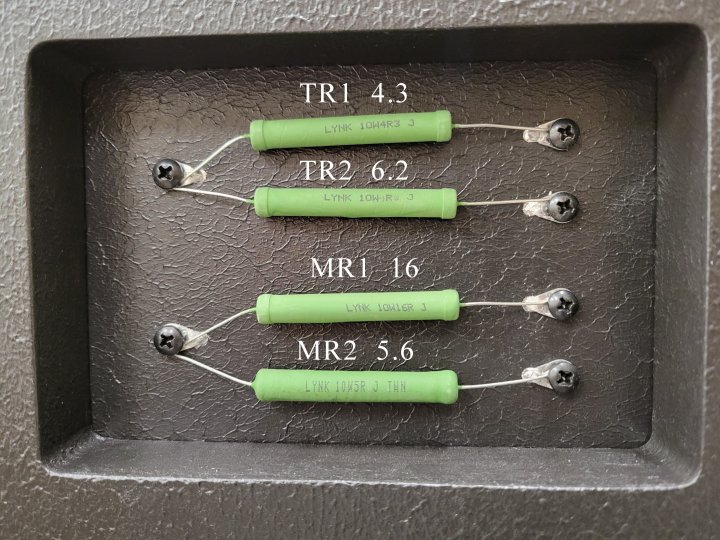
You can adjust the output level of the midrange and tweeter in relation to the woofer (which always runs full output) by changing resistors on the back of each cabinet. Note the four resistors labeled in the photo above:
TR1 – Tweeter Primary
TR2 – Tweeter Shunt
MR1 – Midrange Primary
MR2 – Midrange Shunt
Here’s a closeup photo of a resistor

We refer to the resistors simply as four numbers, from top to bottom, corresponding to the tweeter and midrange resistor locations shown in the photo above.
Here are the factory installed resistors from top to bottom:
4.3
6.2
16
5.6
The top two are for the tweeter TR1 and TR2 and the bottom two numbers are for the midrange MR1 and MR2
You can raise or lower the output level of the tweeter or midrange by replacing the factory resistors with other combinations, using the chart below.
CHART
Tweeter Attenuation
-2db -1db 0
TR1 4.3 4.3 4.3
TR2 4.3 5.1 6.2
Midrange Attenuation
-1db -.5db 0 +.5db
MR1 16 16 16 16
MR2 4.3 5.1 5.6 6.2
Note the factory settings are highlighted in GREEN and shown as a ‘zero’ point. Note that the zero point is not really ‘0 db’, it is a starting point to reference the other attenuation options.
If you want to reduce the output level of the tweeter by one decibel, you would replace TR2 6.2 with a 5.1 and the new set would be:
4.3
5.1
16
5.1
Resistors are included with your Razz to allow for all combinations shown in the chart
Other resistor combinations are available to increase or reduce the output of the midrange and tweeter to a greater degree
A couple of notes: These are very minor changes to the output level. It’s possible that you may not even notice a 1db change in the midrange or tweeter output when you first make the change.
The factory setting is just a starting point. So please, don’t hesitate to try some different settings and take the time to get used to each change you make. Have fun with it, and as always, you have my cell phone number and you can call me anytime for advice or help.
Note that the wires of the resistors are simply bent and shaped so that they make contact with the termination on the board, held in place by a screw. It is important that the wires make good contact with the termination for good signal transfer.
Even though the resistors have an outside coating, it is still a good idea to make sure that they do not make contact with one another after connecting them in place.
I’ll be the first to admit that connecting these resistors with looped wire ends does seem a little crude. But it’s actually a very good connection. Each wire behind the board has a tinned copper termination crimped to the copper wire and then the binding screws bind the loop of the tinned copper resistor wire directly to the termination. For a part that needs to be easily attached and detached, this is about as good a connection for optimum signal transfer as you can have.

Don’t want to be bothered? No problem, just leave the factory settings as they are and enjoy!
You won’t be disappointed, we promise. Razz speakers sound wonderful as they are, direct from the factory. During the development, there was serious consideration given to NOT providing these adjustments due to the fact that it can turn some customers off. If the adjustments are really too much to deal with, we suggest putting it out of your mind and pretend you’ve received these fine speakers that do not offer, nor require crossover adjustments. Then enjoy the heck out of them just the way they are!
